Understanding QuickBooks invoicing, both online and on desktop, can revolutionize your financial management. It can be a lifesaver for businesses of all sizes, simplifying the invoicing process and saving valuable time. This blog aims to demystify this process, walking you through every step to create and send professional invoices quickly and efficiently. No need for advanced accounting knowledge – we’ll break it down into easily digestible steps, helping you improve cash flow, enhance client relationships, and reduce administrative overhead. Now let’s proceed into the nuances of QuickBooks invoicing, crafted for both beginners and seasoned users alike.
Steps Create an Invoice in QuickBooks Online
If you’re selling something and want to get paid later, you should send a QuickBooks invoice to your customers. This can be as simple as an email that tells them what they’re buying. Here we will guide you on making new invoices and keeping track of the ones that haven’t been paid yet. If you’re using QuickBooks Payments, we’ll show you how your customers can pay online. If you’re using a different system to get paid, we’ll help you figure that out, too, with the following means:
Step 1: Create and Send the Invoice
Scenario 1: When Using New Layout
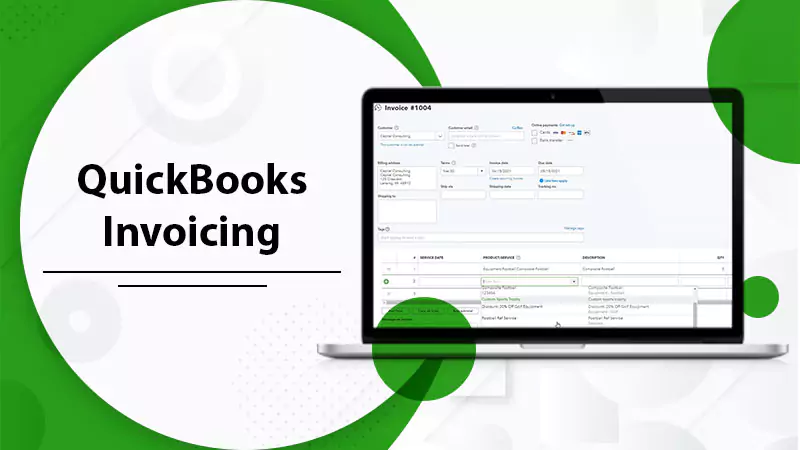
If you’re using the new layout, here’s a simple way to create a QuickBooks invoicing:
There are multiple ways to create an invoice. For instance, if a customer agrees to an estimate you sent earlier, you can turn that estimate into an invoice. But you can also make a completely new invoice.
- Firstly, click on ‘+ New’.
- Secondly, click on Invoice.
- Now, click ‘Add customer’ and pick a customer from the dropdown list. Make sure all the details, especially the email address, are correct.
- After that, check the Invoice date, Due date, and Terms. You can adjust these if you require to. Remember: In the ‘Terms’ field, ‘Net’ tells you how many days the customer has to pay.
- Click ‘Add product or service’ and pick what you’re selling from the dropdown list.
- Choose how you want to work out the price – a fixed price, by the hour, or by item. Fill in the quantity and rate if necessary.
- If you want to change your invoices’ look or details, click ‘Manage’. Choose the options from the side panel. QuickBooks will remember what you picked for all your invoices from now on.
- When you’ve finished, you can do several things with the invoice:
- If you want to send the invoice straight away, click ‘Review and send’ to email it to your customer. You can change the email if needed, then click ‘Send invoice.’
- If you want to send the invoice later, click ‘Save and close.’
- Want a hard copy of the invoice, click ‘Print and download.’
- If your customer has already paid, click ‘Receive Payment.’
- If you want to text your customer with their invoice, click the ‘Share link.’
Scenario 2: When Using Older Layout
If you’re using the old layout, then go with the following steps to create a QuickBooks invoicing:
- Click ‘+ New’.
- Choose ‘Invoice’.
- From the ‘Customer’ dropdown, pick a customer. Double-check that all their information, especially the email, is correct.
- Check the ‘Invoice’ date. You can adjust the due date in the ‘Terms’ dropdown if you need to. Remember, ‘Net’ stands for how many days until the invoice needs to be paid. The default is 30 days, but you can adjust this if required.
- In the ‘Product/Service’ column, choose the product or service you’re billing for.
- Fill in the quantity and rate, and adjust the total if necessary.
- Check the’ Tax’ box if you need to add sales tax.
- When you’ve finished, you have several options for what to do with the invoice:
- If you want to send the invoice now, click ‘Save and send’ to email your customer. If necessary, you can adjust the email, then click ‘Send and close.’
- Want to send the invoice later, click ‘Save and close.’
- If you want to print the invoice, click ‘Save’ and then ‘Print or Preview.’
- If you want to text the invoice to your customer, click the ‘Save and Share’ link.’
Step 2: Checking Unpaid Invoices
The unpaid invoices from QuickBooks are added to your ‘Accounts Receivable account’. You can see this account in your Balance Sheet and other financial reports.
Whenever you want to see your invoices, go to ‘Get paid & pay’ and choose ‘Invoices’ (Take me there). Look at the ‘Status’ column to see what stage the invoices are at.
Here are some typical statuses you might see:
- Due in [days]: You haven’t sent the invoice yet.
- Due in [days] Viewed’: Your customer has seen the invoice.
- Deposited: Your customer has paid the invoice.
- Due in [days] Sent’: You have dispatched the invoice to the customer.
- Overdue [days]: The invoice is late and hasn’t been paid.
- Overdue [days] Viewed: Your customer has seen the overdue invoice but hasn’t paid it.
- Delivery issue: The invoice couldn’t be delivered. Check the email address and try to send it again.
- Voided: The invoice was canceled in QuickBooks.
Step 3: Accept Invoice Payments
If you’re using QuickBooks Payments, your customers can pay their invoices with a credit card, PayPal, Venmo, or ACH transfers. QuickBooks will handle and track these transactions for you. QuickBooks will automatically put payments in the proper accounts as you get payments.
Create QuickBooks Invoicing in Desktop Version
You use QuickBooks invoicing to document sales transactions when customers don’t pay in full at the time of purchase. Invoices help you keep a record of your outstanding payments, also known as accounts receivable. Based on your agreement with a customer, you can make an invoice in different ways using QuickBooks Desktop.
Create a QuickBooks Invoicing from Scratch
If your business doesn’t need sales orders or estimates, the first step in your accounts receivable process is to create a QuickBooks invoicing.
- From the Home screen or the Customers menu, click on ‘Create Invoices.’
- Pick a customer or customer job from the ‘Customer: Job’ dropdown. If the customer or job isn’t on the list, click ‘Add New.’
- Fill in the important details at the top of the form, like the Date, Invoice #, ‘Bill to/Sold to,’ and Terms.
- In the detail section, choose the items. Note: When you pick or add an item, the description and price are filled in automatically based on what you entered when you set it up. You can change or delete this when making invoices.
- (Optional) If you want to give a discount, you need to make a discount item.
-
- From the Home screen, proceed to the Lists menu.
- Click on ‘Item List’.
- Right-click anywhere, then click ‘New.’
- Click on the ‘Type’ dropdown, then click ‘Discount.’
- Fill in an ‘Item Name/Number’ and a short ‘Description.’
- Put the discount amount or percentage in the ‘Amount or %’ field. If your discounts vary, empty the ‘Amount or %’ field and fill in the amount on your sales forms.
- From the ‘Account’ dropdown, choose the income account you want to use to track discounts you give customers.
- Choose ‘Tax Code’ for the item.
- Click ‘OK’.
Creating a QuickBooks Invoicing from a Sales Order
If you’ve made a sales order and it’s been fulfilled, you’ll need to create an invoice. There are two ways:
From the Sales Orders Window
Create QuickBooks invoicing from the Sales orders window with the following steps:
- Click the ‘Create Invoice’ button in the main Sales Orders tab.
- In the pop-up that appears, choose:
-
- ‘Create invoice for all of the sales order(s)’ to include all items from the sales order in the invoice.
- ‘Create invoice for selected items’ if you only want to include some items on the invoice.
- Make any necessary changes to the Invoice. Note: In the list of items, fill in a quantity in the ‘To Invoice (Or Invoiced)’ column for each item. If there’s an item you don’t want to invoice, put ‘0’ as the quantity.
- Click ‘Save & Close’.
From the Invoice Window
With the following steps, create QuickBooks invoicing:
- From the Customer menu or Home screen, choose ‘Create Invoices.’
- Pick a customer or job from the ‘Customer: Job’ dropdown.
- The ‘Available Sales Order’ window will pop up.
- Choose one or more sales orders with items you want to include in the invoice.
- Make any necessary changes to the Invoice. Note: In the list of items, fill in a quantity in the ‘To Invoice (Or Invoiced)’ column for each item. If there’s an item you don’t want to invoice, put ‘0’ as the quantity.
- Click ‘Save & Close’.
Creating a QuickBooks Invoicing from an Estimate
When your customer has agreed to your estimate and decided to pay a set amount (instead of for actual time and costs), you can convert the whole estimate into an invoice.
From the Estimate Window
Follow the given steps and create the QuickBooks invoicing from the Estimate window:
- Open the correct estimate.
- Click ‘Create Invoice’ from the top of the Estimate form.
- If you have activated progress invoicing, you might receive a prompt to specify the items and their quantities that should be included in the invoice. Specify what to include as prompted.
- When the invoice pops up, edit the information as necessary.
- Click ‘Save & Close’.
From the Invoice Window
In the Invoice Window, create the QuickBooks invoicing with the following means:
- From the Customer menu or the QuickBooks Home screen, click ‘Create Invoices.’
- Pick a customer or job from the ‘Customer: Job’ dropdown.
- The ‘Available Estimates’ window will pop up.
- Choose the estimate to include in the invoice. Note that QuickBooks will only let you pick one estimate to invoice. Note: If progress invoicing is turned on, you might get a prompt asking what you want on the invoice. Specify what to include as prompted.
- When the invoice pops up, edit the information as necessary.
- Click ‘Save & Close’.
Setting Up Recurring QuickBooks Invoicing
Using the Online version of QuickBooks, you can set up recurring invoices, saving you time by automating the billing process for regular customers. This ensures steady invoicing, enhances cash flow, and reduces errors due to manual data entry. It’s an excellent feature for businesses that operate on a subscription basis. Here’s how to create a recurring invoice in QuickBooks Online:
- Firstly, navigate to ‘Gear’ > ‘Recurring Transactions’ > ‘New.’
- Next, under ‘Transaction Type,’ select ‘Invoice’ and then click ‘OK.’
- For ‘Type,’ choose ‘Scheduled.’
- Then, make sure to enable ‘Automatically send emails.’
- Complete the remaining form fields and then click on ‘Save template.’
- Repeat these steps for each customer who requires recurring QuickBooks invoicing.
Summing Up
Now, you can create and send QuickBooks invoicing in Desktop and Online versions. Creating invoices allows you to easily manage and streamline these processes with accuracy, consistency, and improved cash flow. This reduces manual data entry errors and saves time, making it an ideal solution for subscription-based and other businesses. If you face any issues while creating or sending invoices, our ProAdvisors are always available to help you. Contact and resolve your issue. Thank You!
FAQs
Q-1:- How to create an invoice in QuickBooks?
Ans:- Navigate to “+ New”, select “Invoice”, choose your customer, and fill in the necessary details such as date, due date, and terms. After that, add products or services, and once done, you can save and send it to your customer.
Q-2:- Can QuickBooks send recurring invoices?
Ans:- Yes, QuickBooks Online allows you to set up recurring invoices. You can do this by going to ‘Gear’ > ‘Recurring Transactions’ > ‘New’, then selecting ‘Invoice’, setting it as ‘Scheduled’, and enabling ‘Automatically send emails’.
Q-3:- How can I view outstanding invoices in QuickBooks?
Ans:- To view your invoices, navigate to ‘Get paid & pay’ and select ‘Invoices’. Then, check the ‘Status’ option to view where invoices are in the sales process. Due or unpaid invoices will be clearly marked.
Q-4:- How can I convert an estimate into an invoice in QuickBooks?
Ans:- Open the correct estimate and select ‘Create Invoice’ at the top of the form. If prompted, specify the items and quantities for the invoice, then edit as needed and save.
Q-5:- How do I handle payments received for an invoice in QuickBooks?
Ans:- After receiving a payment from the customer, select ‘Receive Payment’. If you’re using QuickBooks Payments, the system automatically allocates the payments to the appropriate accounts.